
A complete guide to SFTP receiver adapter Communication Channel configuration in SAP PI/PO and SAP Integration Suite SFTP adapter configuration. Each parameter’s functionality in SAP PI/PO and SAP BTP IS (BTP) is explained in detail.
Additionally, SFTP adapter configuration to connect with an On-Premise SFTP Server in SAP Integration Suite .
Part 1 - SAP Integration Suite
In this article, We will look at the following steps to establish a connection to an SFTP in SAP Integration Suite (BTP-IS/CI/CPI)
Prerequisites to Setting Up the SFTP Connection
Register the On-Premise SFTP Server on Cloud Connector
Ping and Test the Connection to the SFTP Server
Append the Known Host File with the Server Key
Maintain Security Material
Configure the SFTP Adapter
Part 2 - SAP PI/PO
Moreover, We will look at these settings in SFTP Adapter of PI/PO,
SFTP Adapter Transport Protocol, Message Protocol, and Adapter Engine Configuration.
SFTP Receiver Server Destination Configuration.
Authentication Methods of SFTP Channel.
SFTP File Name and Directory Configuration.
SFTP Processing Parameters, Timestamp to File Name, Message-ID to File Name, Write Mode, etc.
Run Operating System (OS) Command in Receiver SFTP Adapter.
Advance Variable Substitution for SFTP File Path and File Name.
Adapter Specific Message Attributes (ASMA) of SFTP Receiver Communication Channel.
Communication Channel Adapter Status.
File Archiving technique.
You can also connect SAP directly with FTP file server and create files.
Part 1 - SFTP Adapter Configuration in SAP Integration Suite
Let’s understand what kind of SFTP Servers SAP Integration Suite can connect to and different authentication methods. Then we will look at how to establish connectivity to an On-Premise SFTP server from SAP Integration Suite CI.
Understand the Type of SFTP Server
SAP CPI supports connecting to various types of SFTP servers, as long as they comply with standard SFTP protocols and are configured appropriately.
Here are the key types of SFTP servers that can be connected via SAP CPI:
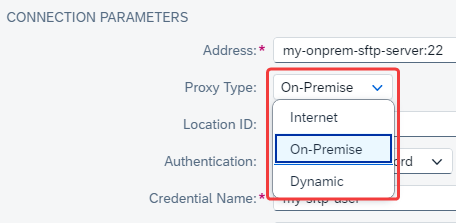
1. On-Premise SFTP Servers
These are SFTP servers hosted within an organization’s internal data centers or IT infrastructure or in a private cloud environment.
Connectivity: To connect CPI to an on-premise SFTP server, CPI needs to access it via a cloud connector or reverse proxy to establish the connection between the cloud (SAP CPI) and the on-premise network.
💡 Tip
On-premise systems are not limited to systems hosted within your organization's private IT infrastructure. They also include systems hosted in private cloud environments that are not exposed to the public internet.
2. Cloud-based SFTP Servers
These are SFTP servers hosted by cloud providers, offering secure file transfer services over the internet.
Popular Cloud SFTP Providers:
AWS Transfer for SFTP (Amazon S3): AWS provides an SFTP service for transferring files into S3 storage.
Azure SFTP (Azure Blob Storage): Azure offers secure file transfer capabilities for storage solutions like Blob.
Google Cloud SFTP: Google Cloud Platform (GCP) provides a secure way to manage file transfers into their cloud storage.
Other Managed Services: Providers like ExaVault, Files.com, etc., provide fully managed SFTP services.
Connectivity: CPI can connect directly to these servers over the internet.
SFTP Authentication Options in SAP Integration Suite CI
Authentication can be done using Username/password or public key authentication. Also, you can use a combination of both.
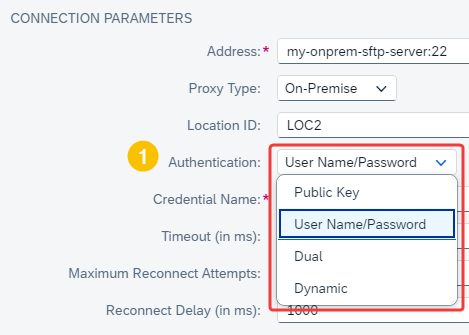
Steps to Connect an On-Premise SFTP Server on SAP Integration Suite
Prerequisites to Setting Up the Connection
SAP Cloud Connector is installed and configured to connect your on-premise network with the SAP Cloud Platform.

SFTP Server Credentials: Obtain the necessary credentials to connect to the SFTP server (username/password or public/private key pair).
Public Key: If using public key authentication, generate the key pair and upload the public key to the SFTP server.
Step 1- Register the On-Premise SFTP Server on Cloud Connector
Log in to the Cloud Connector. Go to “Cloud to On-Premise” in the left-hand menu. Click “Add” and choose “Non-SAP System”.
Back-End Type: Select “SFTP”.
Protocol: Choose “TCP”.
Internal Host: Set the internal hostname or IP address of your on-premise SFTP server.
Virtual Host: Define a preferred virtual hostname.
Internal/Virtual Port: Typically, SFTP uses port 22.
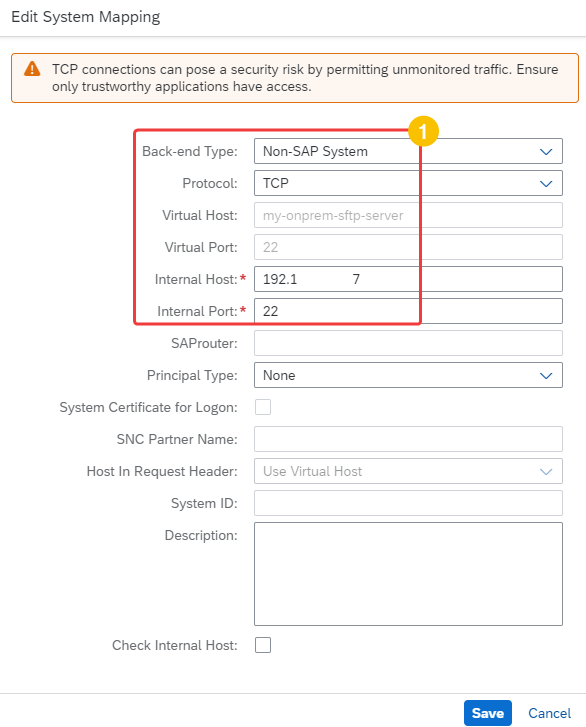
Click “Check Connection” to ensure the Cloud Connector can reach the on-premise SFTP server.

Step 2 – Ping and Test the Connection to the SFTP Server
Open Connectivity Tests:
This tool allows you to test connections to various protocols, including SFTP.
In the Monitor section, go to Manage Security → Connectivity Tests.

Enter the SFTP Connection Details:
Host: Enter the hostname or IP address of the SFTP server.
Port: Typically, the default port for SFTP is 22, but you may need to change this if your server uses a different port.
Authentication: Choose the appropriate authentication method:
User Credentials: If using username/password authentication, enter the username and password.
Private Key: If using key-based authentication, upload the private key or reference it if it’s already stored in the Security Material.
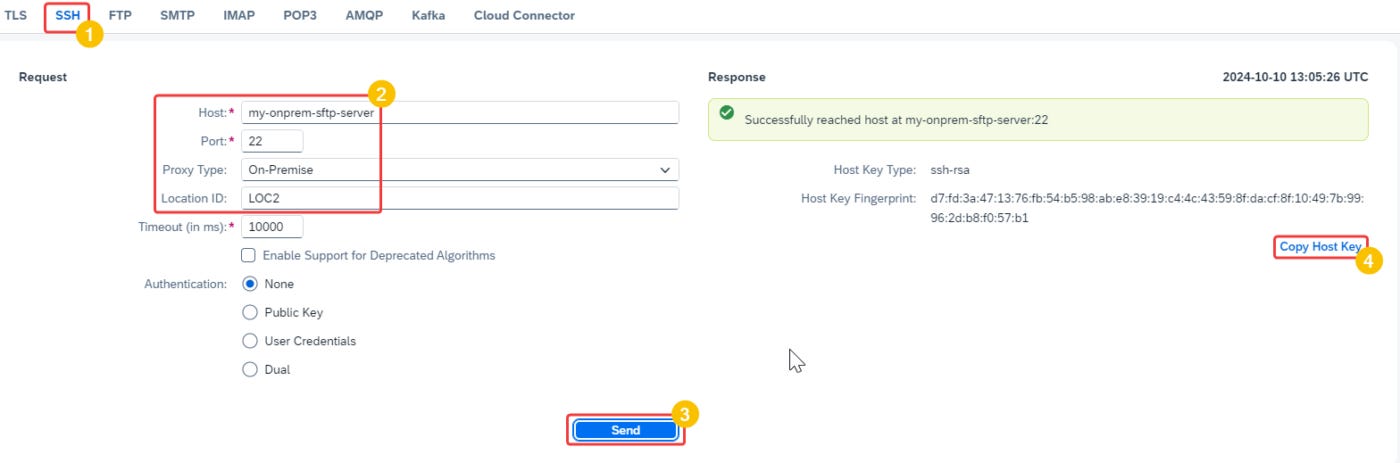
Copy the Host Key:
I will keep the authentication as “None” to just ping the server and get the Host Key. Hit “Send” and check the response. If there are no issues, you will be able to copy the Host Key of the server using “Copy Host Key” option.
You can save the Host Key copied from the above step for later use.

Step 3 – Append the Known Host File with the Server Key
Usually, a running system should have a Known Host file already. Download the Known Host file and append the Host Key of the SFTP server copied from above step to the bottom of the file. Then upload the file again to the Security Material using the “Upload” option.
If you do not have a Known Host file, you can directly upload the file with the Host Key entry.

⚠️ Important
Always download the existing Known Hosts file first, then apend the new host entry to the end of the file before uploading it again. Do not upload a file containing only the new host entry. Uploading a Known Hosts file replaces the entire list, so any existing entries that are not included in the uploaded file will be deleted.
Be especially careful when performing this task in the Production environment.
Maintain Security Material
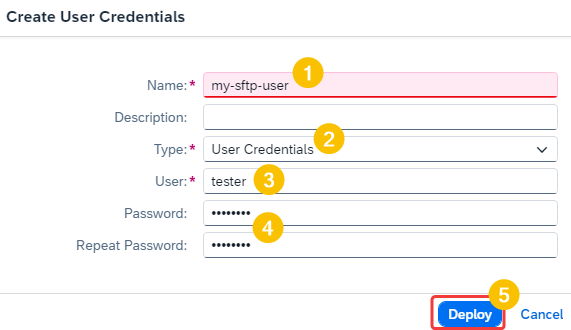
Here I am using username/password for authentication. The security details should be maintained as Security Material.
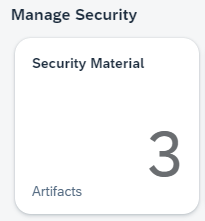
Go to “Manage Security” and “Security Material”
Maintain the username and password and give it a meaningful name (identifier).
📚 Access to over 200+ video tutorials on SAP Integration Suite
If you’re looking to learn SAP Integration in a structured and comprehensive way, I offer a course with over 200 lessons that take you from a complete beginner to a confident integration developer.
With clear, bite-sized lessons, you’ll master the fundamentals and advanced concepts in the shortest possible time. Whether you’re new to SAP or looking to enhance your skills, this course is designed to accelerate your learning journey.
Configure the SFTP Adapter
Now configure the SFTP receiver adapter.
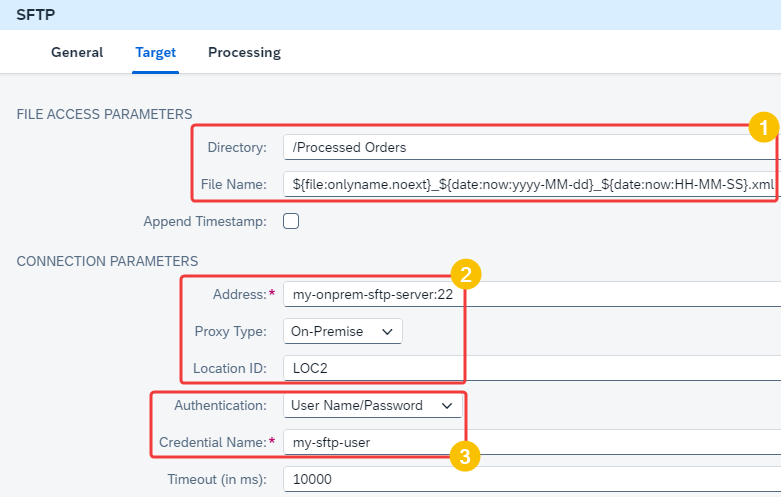
Address: The SFTP server’s hostname or IP address. Provide the virtual host name we configured before
Port: The port used by the SFTP server (default is
22).Location ID: Location ID configured in Cloud Connector. We defined it as “LOC2” in Cloud Connector, which is one of the prerequisites.
Credential Name: Refers to the credentials deployed in the Security Material section of the tenant in the above step. In this example, my-sftp-user.
Directory: The directory path on the SFTP server where files will be uploaded (e.g.,
/Processed Orders).Filename: The name of the file that will be written to the SFTP server. You can use expressions like
${propertyName}or${headerName}to dynamically generate the filename.
Write Mode
Overwrite: If the file already exists, it will be overwritten.
Append: Data will be appended to the file if it exists.
Create New: A new file will be created with a unique name (e.g., by appending a timestamp).
Processing Mode
Binary/Text Mode: Specifies whether the file is transferred as binary or text.
File Type:
Binaryfor binary files.Textfor plain text files.
Timeout
Connection Timeout: Specifies how long (in milliseconds) to wait for the SFTP server to respond before timing out (e.g., 60000 ms = 60 seconds).
Part 2 - SFTP Adapter Transport Protocol, Message Protocol and Adapter Engine Configuration in SAP PI/PO
Adapter type ‘SFTP’ has only one Transport Protocol which is ‘SFTP’ itself. Depending on your PI/PO version you can configure the Adapter Engine. Usually, the default Adapter Engine is ‘Central Adapter Engine’ and it will be populated automatically.

Message Protocol – File Content Conversion.
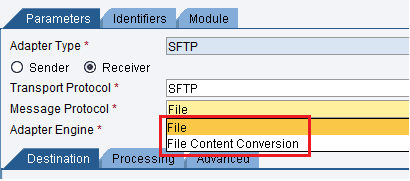
If the target message (file) created by Message Mapping needs to be converted by the Receiver Adapter Communication Channel select the option ‘File Content Conversion‘. Usually, if the receiver file format is anything other than XML, you can use this feature to convert the file to an appropriate format such as CSV, Text, etc.
SFTP Receiver Server Destination Configuration.
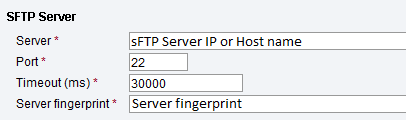
Server
Defines the TCP/IP of the SFTP server. It can be configured as a hostname or IP address.
Port
The default SFTP port is ’22’. This Parameter defines the Port of the SFTP server.
Timeout (ms)
The timeout parameter defines how long the transmitted file remains unacknowledged by the receiver SFTP server. After the defined time (ms), when the receiver Communication Channel terminates the connection, set the message to error status and log the error in Message Log.
Server Fingerprint
When you connect to the SFTP server for the first time using any SFTP/FTP clients such as FileZilla, WinSCP, etc., Server Fingerprint will be promoted.
Authentication Methods of SFTP Channel.
There are three Authentication Methods in the sFTP adapter:
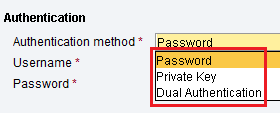
Password
Private Key
Duel Authentication
SFTP Authentication Method ‘Password’.
The password method authenticates the connection with the sFTP server using the Username Password combination.

SFTP Authentication Method ‘Private Key’.
Authentication using ‘Private Key‘ method allows us to connect to sFTP server more securely. During design time, system administrators of PI/PO system and sFTP server owners should exchange respective ‘Public Keys’ and install them. Public Key of sFTP host should be installed in PI/PO server and vice versa.
System Administrators (BASIS) maintain the SSH keys in Key Store under ‘Certificates and Keys‘ section of ‘Netweaver Administrator‘
SAP Netweaver Administrator > Configuration > Security > Certificates and Keys.
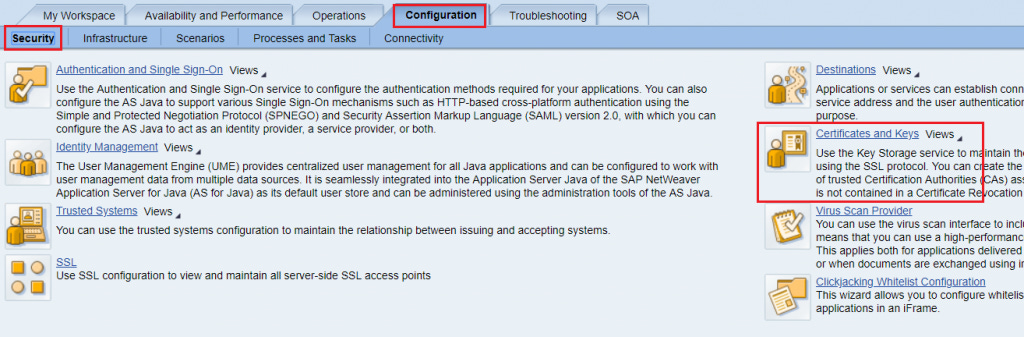
In older versions of SAP PI or XI key store can be accessed under,
NWA > Configuration Management > Security > Certificates and Keys > Key Storage > Content > Keystore Views.
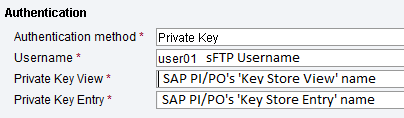
What we configure with Private Key View and Private Key Entry parameters is the SAP PI/PO’s Private Key information. During the system setup (configuration) only Public Keys of the servers are exchanged and installed. At the time of actual connection or handshake with SFTP, Private Key configured in the Communication Channel and Public Key installed in SFTP combination decrypt the data and allow the connection.
Username is the SFTP username.
SFTP Authentication Method ‘Duel Authentication’.
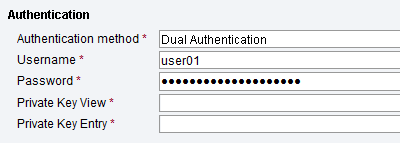
This is simply a combination of ‘Password‘-based authentication and ‘Private Key‘-based authentication.
SFTP File Name and Directory Configuration.
There are several ways to configure the File Name and Directory of receiver files. You can do it by using parameters in the receiver Communication Channel or set the file names dynamically at run-time.
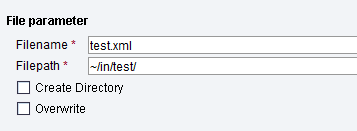
The configuration above defines the receiver file name as ‘test.xml‘, and files will be generated in the directory ‘/home/username/in/test/’. Prefix ‘~’ defines the home directory of the user configured in ‘Authentication Method’.
You can also define a directory without the prefix ‘~’.
You can set the filename and directory dynamically using any of the methods below. Check my previous posts on in-detail examples of each method.
SFTP Processing Parameters, Timestamp to File Name, Message-ID to File Name, Write Mode, etc.
Add Timestamp to filename.
Add the timestamp in format YYYYMMDD_HHMMSS-xxx before the extension of the filename. If the configuration is activated and File Name parameter is set as ‘Test_.XML’, the name of the receiver files will be set as Test_YYYYMMDD_HHMMSS-xxx.XML. ‘xxx’ is a random sequence number generated by Adapter Engine.
Add Message-ID to file name.
Add the PI Message ID to the file name. This is a great way to avoid overwriting files at the receiver by keeping the file name unique.
Write Mode — Direct.
Files are written directly to the specified folder in File Parameter’s Directory.
Write Mode — Temporary Mode.
Files are written at the receiver under temporary names before being converted to the specified format in the Communication Channel. Even with a timestamp in the filename, there is a possibility of overwriting files when large number of files are generated at the same time (same second). This is the best method to use if there is a chance of receiver picking up the files and processing them while they are being generated by PI/PO. Temporary mode creates each file with a unique name and changes the filename to specified format after file generation is completed.
In Temporary File mode, file names are first set as <timestamp><file name>.tmp. The time stamp here is up to a millisecond.
Empty File Handling.
Setting this parameter as ‘Write Empty File‘ will allow you to create empty file in the target directory. Otherwise set it as ‘Ignore‘ so empty files are not created at the receiver directory.
Store Attachments.
Allow the adapter to save attachments in the PI message and in the target directory.
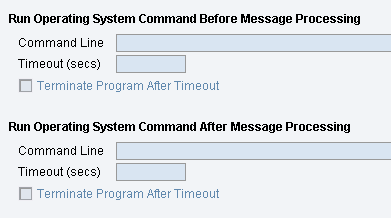
Run Operating System (OS) Command in Receiver sFTP Adapter.
These two parameters allow us to run OS commands before and after message processing. OS scripts should be defined in Command Line parameter.
Advance Variable Substitution for SFTP File Path and File Name.
Parameters defined in ‘Filename’ or ‘Directory’ can be replaced by message payload attributes using this option. For example, replace the file name with a field value from a target message (after Message Mapping). Check out my previous post on how to set the Purchase Order number in the target message to file name using the Variable Substitution method.
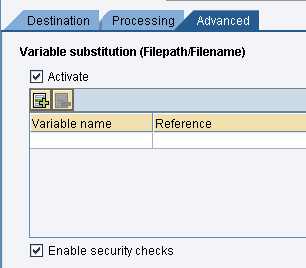
Enable Security Check if you want to validate the Directory path for characters such as ‘.’, ‘\’, ‘/‘. If these characters are found after the variable substitution, message is set to error.
Adapter Specific Message Attributes (ASMA) of SFTP Receiver Communication Channel.
Filename and Directory can be copied from the incoming message using ASMA. SFTP Adaper Specific Message Attributes are included under namespace ‘http://sap.com/xi/XI/System’.
In order to use these attributes, you also need to set ASMA in the sender adapter Communication Channel.
Go to message content’s Dynamic Configuration to view these attributes.
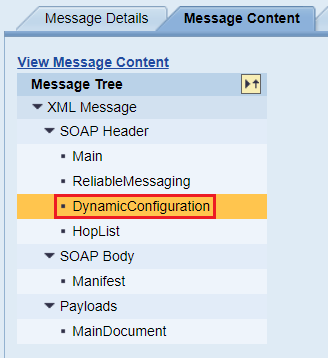
Notice the FileName and Directory attributes under “http://sap.com/xi/XI/System/File” namespace. These are automatically set from Sender sFTP Adapter Communication Channel when ASMA is activated. Use them in the Receiver Adapter using Dynamic File Name generation methods.
<?xml version="1.0" encoding="utf-8" ?>
<sap:DynamicConfiguration xmlns:SOAP="http://schemas.xmlsoap.org/soap/envelope/" xmlns:sap="http://sap.com/xi/XI/Message/30">
<sap:Record namespace="http://sap.com/xi/XI/Message/30/routing" name="SourceMessageType"/>
<sap:Record namespace="http://sap.com/xi/XI/System/File" name="Directory">/out/test/</sap:Record>
<sap:Record namespace="http://sap.com/xi/XI/Message/30/routing" name="InterfaceDeterminationHash">60fde8e2912f3f0ae7109f852b1f7f08</sap:Record>
<sap:Record namespace="http://sap.com/xi/XI/Message/30/routing" name="SourceMessageTypeNS"/>
<sap:Record namespace="http://sap.com/xi/XI/Message/30/routing" name="InterfaceFromOperation"/>
<sap:Record namespace="http://sap.com/xi/XI/Message/30/general" name="senderAgreementGUID">11ce9cb7133b3e50a27ac679e2e0772b</sap:Record>
<sap:Record namespace="http://sap.com/xi/XI/System/File" name="FileName">test_20190223-133040-125.xml</sap:Record>
</sap:DynamicConfiguration>
Communication Channel Adapter Status.
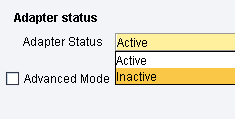
If adapter status is ‘Active“, adapter is allowed to exchange messages. If the status is ‘Inactive‘, Communication Channel is blocked from exchanging messages.
Archiving of Files.
Archiving configuration allows you to save the files in your PI/PO server. Archive Name parameter defines the location (Directory) of the archive files saved.
Use these substitution parameters to define the Archive location of the PI/PO server.
%SEQNUM: A sequence number, starting with 1
%RTSEQNUM: A server wide sequence number, starting with 1
%START: The start time of the adapter
%TIME: The archiving period in milliseconds
%MSGID: The XI message ID
if you have any questions on SFTP receiver Adapter configuration or any of the parameters of the Communication Channel, please leave a comment below.
The post Receiver SFTP Adapter Configuration – SAP Integration Suite CPI and PI/PO appeared first on SAP Integration Hub.